HYPER-V MEMORY FORENSICS PLUGINS WITH VOLATILITY

Friday, 17. October 2014

My motivation for this project has to do with the number of hyper-v systems that I interact with on a day-to-day basis. I recently came across a compromised Windows 2008R2 Hyper-V host and wrote this plugin to improve my understanding of the code base and to create something useful for future use. Hopefully there is some interest in the plugin so I can continue its development to enhance its features.
Anyone looking for the GrrCON 2014 presentation you can get it here https://drive.google.com/file/d/0Bz3L4ZnVlUY8RlNsR1FpY0o5V1U/view?usp=sharing

I have three very simple, but useful plugins currently, which are hpv_vmconnect, hpv_vmwp, and hpv_clipboard. You can download them  at: https://github.com/wroersma/volplugins/blob/master/hpv.py

To help you visualize how the networking is configured on my hyper-v host, here is a simple Visio diagram of how it’s set up.
visio

hpv_vmconnect

The vmconnect plugin tells you what user is currently using the virtual connect console on a particular virtual machine.  It displays their username, the domain they are connected from, and the create time also reflects when the current console was last accessed.

~/python  vol.py -f  Win2012R2.vmem –profile=Win2012R2x64 hpv_vmconnect
Volatility Foundation Volatility Framework 2.4
Process: vmconnect.exe
PPID: 1552
PID: 2684
Create Time: 2014-09-28 05:12:54 UTC+0000
Host Computer Name: HV01
User Name: wyatt
User Domain Name: domain.local
VM GUID: 16AA09F1-2B2C-4B8E-A46E-E6FAD7988878 

hpv_vmwp

The virtual machine GUID is the biggest identifier of the virtual machine and its components.  A user account with the GUID is dedicated to this process and has no rights otherwise. Using the GUID you can identify which process is running for each virtual machine on the hyper-v host server. More information can be found manually and I’d like to expand the plugin at some point to support that as well. The create time does reflect when the last virtual machine was started.

My original goal for this plugin was to implement a memory mapping technique from this process to the virtual machine. Unfortunately I was unable to accomplish this in time due to my lack of understanding, but will hopefully have time to finish this up in the near future.

~/python  vol.py -f  Win2012R2.vmem –profile=Win2012R2x64  hpv_vmwp
Volatility Foundation Volatility Framework 2.4
Name             PID    PPID   Create Time                    GUID
—————- —— —— —————————— —————————————-
vmwp.exe         2684   1552   2014-09-28 05:10:37 UTC+0000   16AA09F1-2B2C-4B8E-A46E-E6FAD7988878  

hpv_clipboard

While I need to improve upon the formatting, this plugin displays data typed the hyper-v virtual console through the “Type Clipboard Text” option and will also display hotkey commands like Ctrl-Alt-Del and if it completed successfully or not.

All clipboard data is listed right after the process in which the data is discovered. I need to work on a better format to display the difference between what each process is responsible for.

~/python  vol.py -f  Win2012R2.vmem –profile=Win2012R2x64  hpv_clipboard
Volatility Foundation Volatility Framework 2.4
Process : vmconnect.exe   PID : 2684
Clipboard Data: Simulating typing Ctrl-Alt-Del.
Clipboard Data: Simulating typing Ctrl-Alt-Del completed successfully.
Clipboard Data: Simulating typing ASCII characters ‘{0}’.
Clipboard Data: Simulating typing ASCII characters completed successfully.
Clipboard Data: Simulating typing ASCII characters ‘d=bp=$6XZ\\ ,
Clipboard Data: Simulating typing ASCII characters ‘d=bp=$6XZ\\ ,y/_}K()Nk!’DVe,
Clipboard Data: Simulating typing ASCII characters ‘d=bp=$6XZ\\ ,
Clipboard Data: Simulating typing ASCII characters ‘d=bp=$6XZ\\ ,y/_}K()Nk!’DVe,

I plan to release another blog post following more data that I’m still in the process of researching. I will also be updating the plugins after some heavy testing, implementing some new features like listing the vm name, IP address, and other information. Follow my twitter account@wyattroersma to receive the latest updates for my blog! Also please feel free to leave feedback or contact me.

CryptoWall Encrypted File Recovery and Analysis

Monday, 7. July 2014

Update:This will not help you with versions of CryptoWall 2.0 and up they have since patched this issue. 

A couple of weeks ago I got a call from a client that one of their employees had clicked on an attachment named “electronic_fund_transfer.zip” in a spam email. Naturally, the employee opened the PDF from within the zip file and then clicked “Run” to launch the executable inside.

In a typical organization, the main concern in such a situation would be what data was exfiltrated from the environment, not the data that was lost due to not having proper backups. You could just wipe the system and restore any lost data from backup, and spend your time figuring out what the malware accomplished while on the system. Well, this client didn’t have working backups in place and the user had also mounted file server shares to his laptop. So, not only did his data get encrypted, some of the data on the file server did as well, with no backups for months of either system.

When the client first contacted me they called it “CryptoDefense” which we can indeed decrypt without issue because there is plenty of data out there on how to do that. Naturally, once we arrived on site, we quickly found out that this was the much more advanced CryptoWall malware that doesn’t store the private key needed to decrypt the files on the local system.

At that point I was between a rock and a hard place because we had initially told them it was possible to recover the encrypted data. However, the majority of resources on the Internet indicate that it’s not possible to recover data at all when CryptoWall is installed as opposed to CryptoDefense. Most file recovery methods suggest using VSS copies to recover the data or backups, otherwise you’re simply out of luck. In these cases, I do not consider paying the data terrorists as an option.

So, as part of our basic Triage process, we obtained memory and disk images. These helped a lot in understanding how this malware works and achieving the ultimate goal of recovering the data.

To work with the malware for this blog post I created a virtual machine, fresh to launch this malware on, to run a few scans and tests.

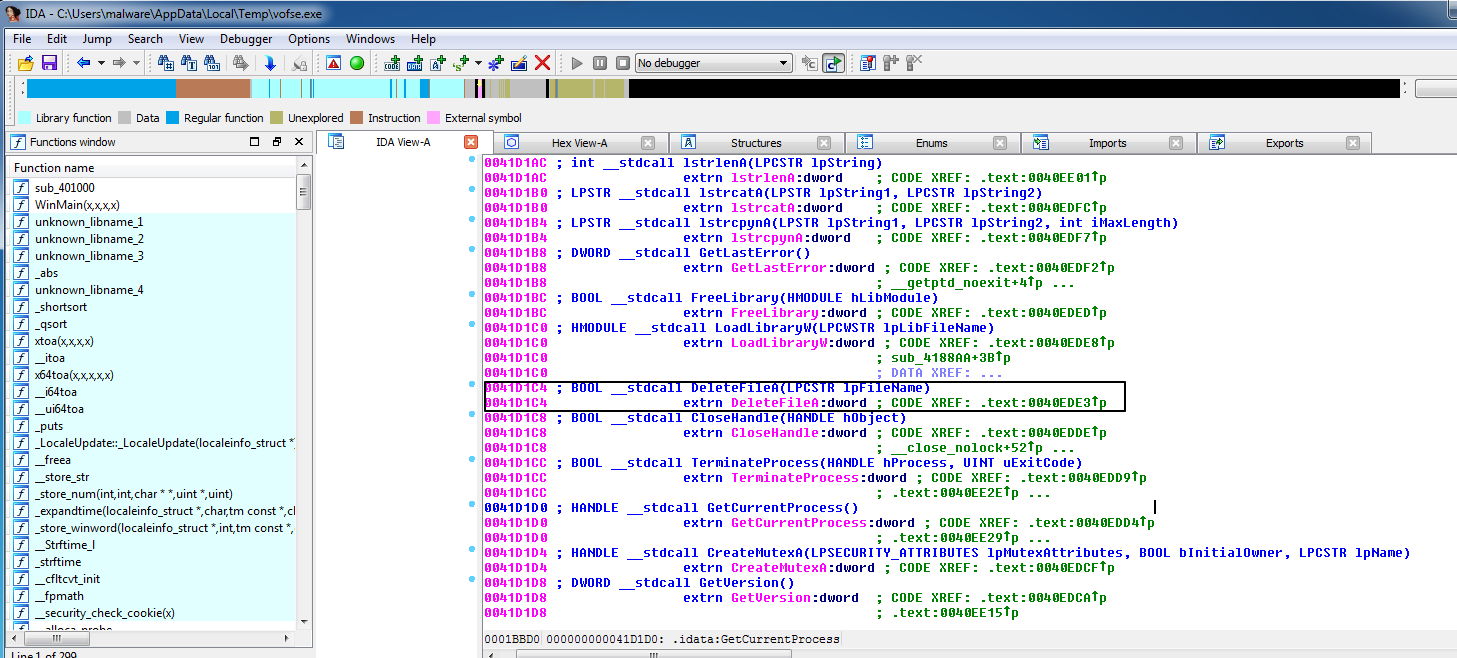
My first goal was to determine how this malware was encrypting the data and in which method it was deleting the original files. I searched the strings file created from the volatility strings plugin. I used IDA pro on the “vofse.exe” file that does the encryption part (it’s the second file that is downloaded after sicac.exe). The ransomware was simply using the DeleteFile Function to remove the files after making a copying from the original file.

This screenshot is where the ransomware finds the file and creates a copy of it.

Ida-pro-create-read-file

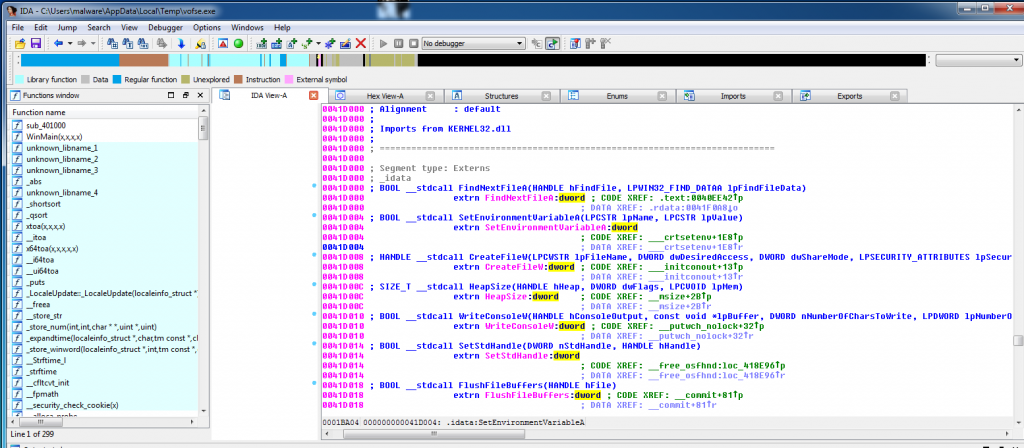
Here is a screenshot with the DeleteFile function highlighted.

Ida-pro-delete-file

So, I made a disk image before installing the malware and another after letting the malware run to “encrypt” the files.

First, to get a list of the files it “encrypted” I printed out the list it makes in the registry. To find the registry key that the malware created, look in “HKCU\Software\<unique ID>\ CRYPLIST\” as it contains a list of the encrypted files.

root@BT:~/volatility-master# python vol.py -f win7.vmem –profile=Win7SP1x64 printkey -K “Software\1C1AA48085BD197637A78463CBBE8BC2\CRYPTLIST”

Legend: (S) = Stable   (V) = Volatile

—————————-

Registry: \??\C:\Users\malware\ntuser.dat

Key name: CRYPTLIST (S)

Last updated: 2014-06-09 12:45:57 UTC+0000

Subkeys:

Snip…

Values:

REG_DWORD     C:\Users\malware\Documents\00698_snowmountains_1920x1200.jpg : (S) 2054688515

2054688515

Snip…

REG_DWORD     C:\Users\malware\Documents\400 – Linux Software RAID Rebuild.doc : (S) 2054688515

REG_DWORD     C:\Users\malware\Documents\Cisco_2014_ASR.pdf : (S) 2054688515

REG_DWORD     C:\Users\malware\Documents\GrrCON-Challenge.docx : (S) 2054688515

REG_DWORD     C:\Users\malware\Documents\Microsoft SQL Server AlwaysOn Solutions Guide for High Availability and Disaster Recovery.docx : (S) 2054688515

REG_DWORD     C:\Users\malware\Documents\Sophos_ZeroAccess_Botnet.pdf : (S) 2054688515

REG_DWORD     C:\Users\malware\Documents\YARA User’s Manual 1.6.pdf : (S) 2054688515

REG_DWORD     C:\Users\malware\Downloads\00698_snowmountains_1920x1200.jpg : (S) 2054688515

Snip…


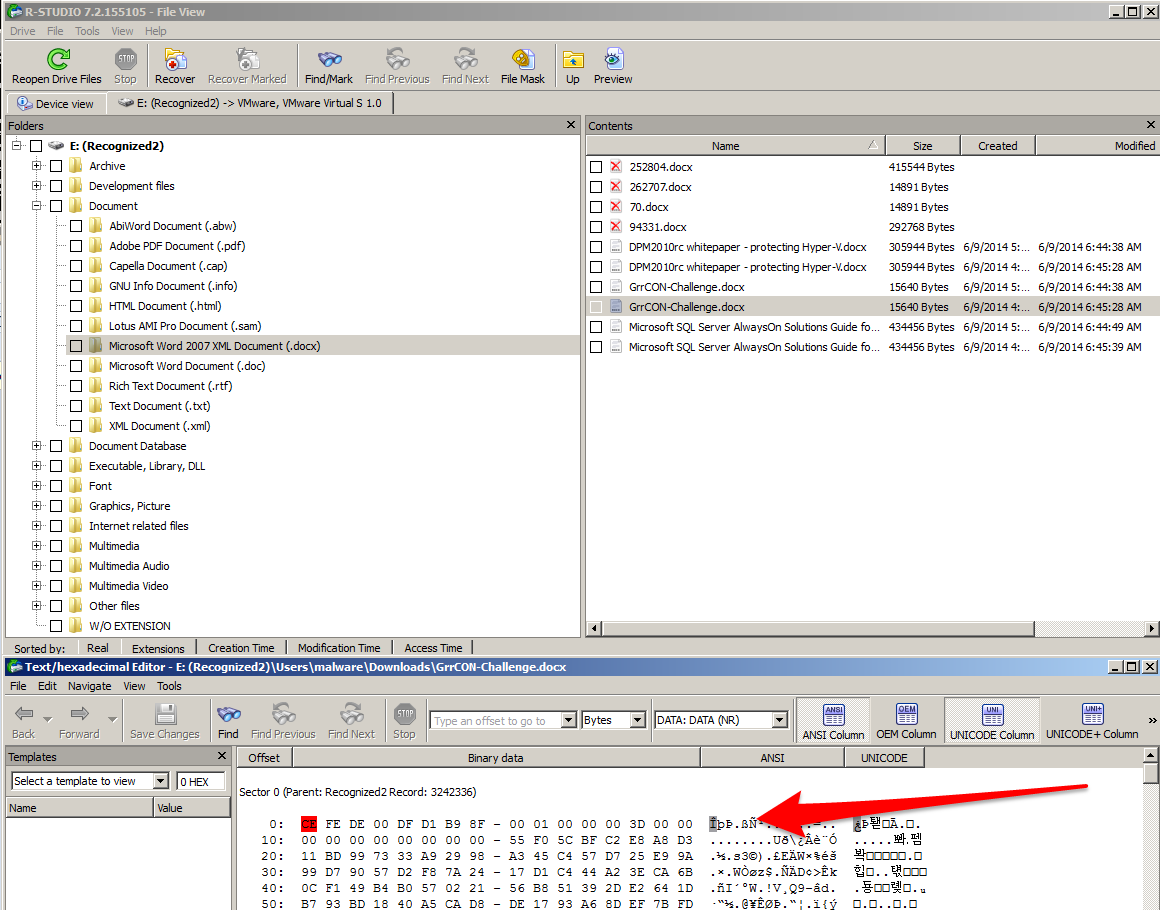
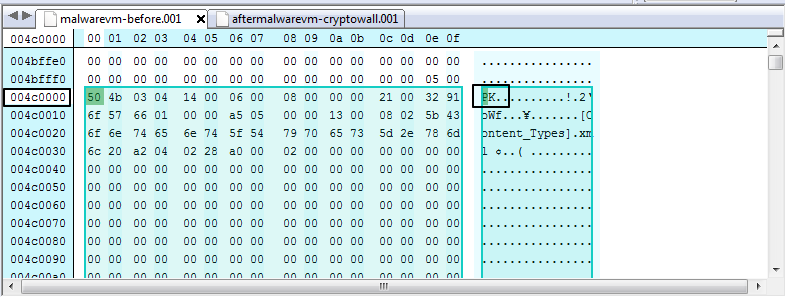
I then opened “GrrCON-Challenge.docx” (one of the encrypted documents) in a hex editor, copied the raw hex values, and searched through both of my disk images, before the malware, and after the malware. While the file itself was removed according to the malware it was still in the same spot on disk at offset 004c000 in both disk images.


Here is the file in the “malwarevm-before.001”:

malwarevm-before

Here is the “GrrCON-Challenge.docx” document at the same offset 004c000 on the “aftermalwarevm-cryptowall.001”

malwarevm-after

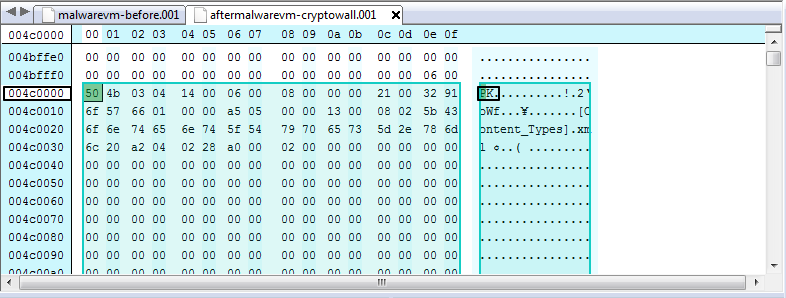
I also opened the encrypted version of “GrrCON-Challenge.docx” and then searched the “aftermalwarevm-cryptowall.001” to find where it was located on disk to confirm they create a new file compared to the old disk image. I will note one very interesting fact: while I have two versions of the “GrrCON-Challenge.docx” file, the malware only created one encrypted version.

malwarevm-encrypted-file

Now that I have confirmed that the malware isn’t fully deleting the files, I want to test it out on some more files to see how much data I can recover.

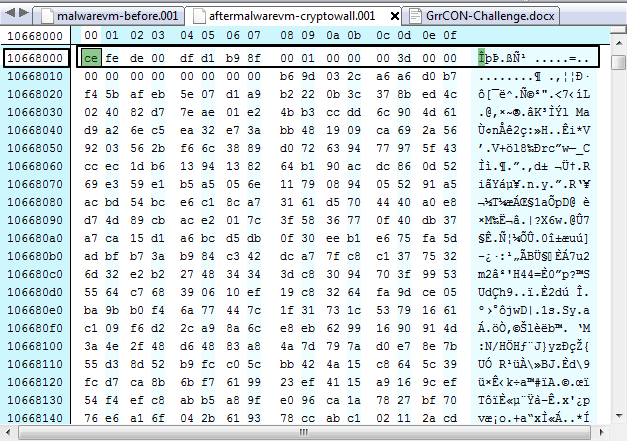
I ran one of my favorite file recovery tools called R-Studio (Yes, I like it because it’s fast and saves me some time from the more manual solutions available). R-Studio is a very simple program. Basically, all you have to do is mount a drive and scan it, and then choose which file types you want to look for. I just used the default configuration on the “aftermalwarevm-cryptowall.001”. I selected the Microsoft Word 2007 XML Document (.docx) and noticed I had two sets of files. The ones with file names are the encrypted version by CryptoWall and the ones without names are the files that were deleted recoverable from slack space.

r-studio-docx

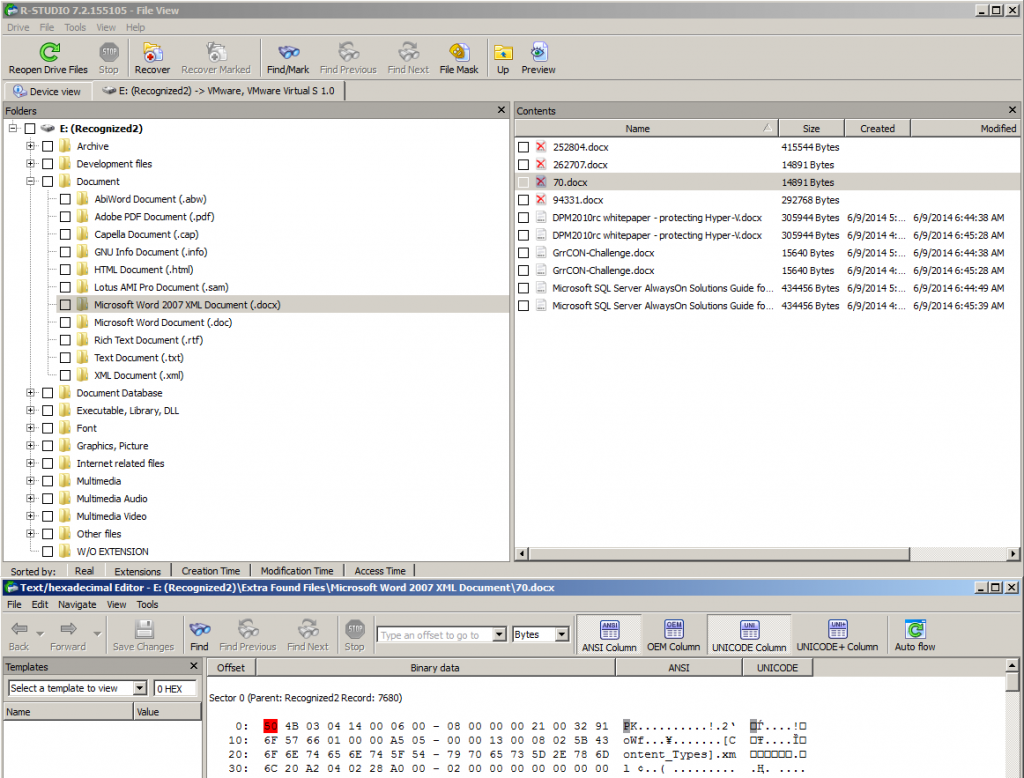
Based on the file size and hex values I know “70.docx” is my “GrrCON-Challenge.docx” file, so I clicked on the view process before recovering the file to ensure it’s the proper file from the hex view and not the encrypted file. I was indeed correct because the picture above lists the file header as “PK” which is the proper file header in the docx file.

Listed below is a screenshot of the encrypted file and its header so we know if we are looking at an encrypted file or not.

r-studio-docx-grrconchallenge-hex-view

In my test example all encrypted files start with the header “CE FE” in hex, which will be different on each system that is hit will CryptoWall.

So I recovered all the files and ran a sha256 hash verification to ensure all my recover files matched the original files.

Recovered File Hash Check

recoverd-hash-check

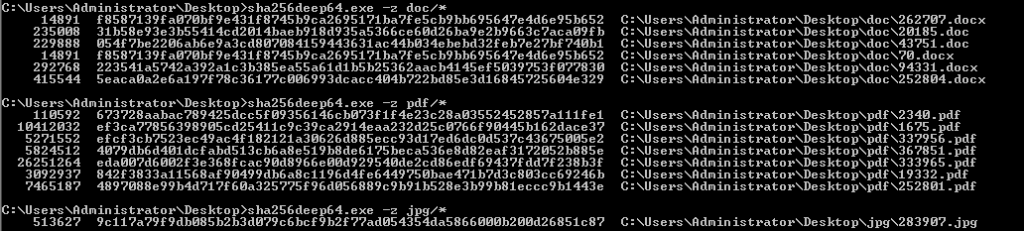
Original File Hash Check

recoverd-hash-check-og

I only tested with a few files in the following formats, docx, doc, pdf, and jpg. As a disclaimer with all file recovery some files may not be recoverable if the slack space was overwritten. In each separate case, file recovery will depend on how many files were encrypted, and how much free space the drive had before it had to start overwriting old slack space for new files.

If anyone wants to look at the attachment that launched the attack, here it is, along with the malwr.com automated analysis, which is somewhat helpful. *Note: you have to sign up to download the file, and use at your own risk. I am not responsible for any damages you cause to yourself.

https://malwr.com/analysis/ZmU1MzE0MmU5MmExNDc5YjkxMDQ2ZmI1ZWEyYjM4Nzk/

In my client’s case I was able to recover approximately %95 of the files, however based on their actual need we only searched for the critical documents and nothing that was lost from the user’s personal files. Just because ransomware encrypts the data doesn’t mean it’s lost forever because to actual erase the files would be much more time consuming and resource intensive. It also would be impossible to actually zero out the files on a file server because the user doesn’t have the proper permissions to access the raw drive in that method (*If permissions are properly setup that is, and User quotas are in place). If anyone would like the files used in this blog post, I would be happy to share the full images. I would also be happy to accept comments and questions just send me an email to wyattroersma (at) gmail.

If anyone would like to know more about memory forensics I’d recommend pre-ordering this The Art of Memory Forensics http://www.amazon.com/The-Art-Memory-Forensics-Detecting/dp/1118825098. Also if anyone needs assistance with Cryptowall or any other piece of malware please just email me.

I’d like to Thank Andrew Case and Michael Hale Ligh for their advise and review of this blog post write  up. I’d also like to thank DoctorW0rm a reddit user who found some technical flaws which I have corrected from “CryptoLocker to CryptoDefense”

Edit:This will not help you with versions of CryptoWall 2.0 and up they have since patched this issue. 

Hyper-V 2012 and 2012 R2 live virtual machine memory acquisition and analysis

Monday, 28. April 2014

Introduction

In my previous post I went over analyzing Hyper-V saved state files in Volatility  using a tool call vm2dmp. I mentioned some limits of the tool for VM’s on 2012 and later Hyper-V host systems. Another major downside was a limit of 4GB RAM size on the VM, which would cause the tool itself to crash out. However the biggest downside was having to actually pause a running VM to obtain the data with no live acquisition option for anyone who can’t just take a server down in the middle of the day.

Using a tool called LiveKd we now can analyze Windows virtual machines on both the 2012 and 2012 R2 platforms including VM’s with RAM sizes larger than 4GB. LiveKd also brings a major feature that vm2dmp wasn’t capable of, you can use it to dump out the memory of a live VM into Microsoft crash dump format without pausing it. This will be very critical for an incident response analyst that can’t pause VM’s for memory acquisition. LiveKdalso requires that the Debugging Tools for windows be installed on the Hyper-V host itself which can have some impact if you don’t already have them installed.

Acquisition

Requirements for the Hyper-V host

Install the Debugging Tools for Windows

Download LiveKd from Sysinternals and extract to the directory of C:\Program Files (x86)\Windows Kits\8.1\Debuggers\x64

Run an elevated command prompt and change the directory to the location of LiveKd.exe

Run livekd.exe (Accept the EULA)

If you haven’t installed symbols for the Hyper-V host, LiveKD will ask if you want it to automatically configure the system to use Microsoft’s symbol server, or you can manually set the symbols yourself.

FirstLiveKdrun2
If you want to list the virtual machines on the server just use the –hvl options and it will list GUIDs and names of running Hyper-V VM’s.

Example: livekd.exe –hvl

livekd -hvl

If you want to create a full crash dump of a virtual machine running on the host system you would run

>livekd.exe –hv (System name or GUID) –p (to pause the system to create a more consistent image) –o (output-file)

Example: livekd.exe –hv DFIR-PC –p –o DFIR-PC.dmp

livekd dump vm

If the virtual machine cannot be paused due to business reasons, you may omit the –p command line option, and create a crash dump from the live running VM. From my testing I can confirm that very little image smearing occurs. For further command line options visit Using LiveKD. Because Volatility  supports the crash dump address space you can then use all the normal plugins.

Once you have converted to a crash dump you then use Volatility’s  Imagecopy plugin to convert the crash dump format to a raw memory dump.

Example: python vol.py –f /dir/crash dump

–profile=/profile/of/vm/ -O /dir/memory.raw

Once the memory dump is in a raw format you can use the raw image in other tools like Redline.

Currently this process is limited to virtual machines running Windows only, in my next blog post I’ll discuss the acquisition process for linux VM’s in Hyper-V 2012 R2.

If anyone has any helpful feedback please DM me on twitter @wyattroersma even more so if you have found something stated here that isn’t accurate.

Other References:

http://blogs.technet.com/b/markrussinovich/archive/2010/10/14/3360991.aspx


Analyzing Hyper-V Saved State files in Volatility

Thursday, 17. October 2013

Introduction

Volatility can analyze Hyper-V Virtual Machine’s saved state once the (.bin) and (.vsv) files are converted to a crash dump using vm2dmp http://archive.msdn.microsoft.com/vm2dmp. This tool currently supports up to Hyper-V 2.0 (Windows Server 2008R2 and 2008) files. At this point I do not know of any support for Hyper-V 3.0 (Windows Server 2012 and up). In order for this process to work the VM must either be in a saved state or from a snapshot.

Acquisition

The Virtual Machine configuration (XML file located in the virtual machine folder in the path of the virtual machine) file points to the path of the .bin and .vsv files that are required to convert them to a crash dump.  For example the follow snippet was pulled from one of my virtual machines XML file. Recently I have discovered that any VM that has 4GB of RAM or more will cause the VM2DMP with an error like “ERROR: Failed to map guest block 4096 to any saved state block! ERROR: Element not found.”

<savedstate>

<memlocation type=”string”>

V:\ComputerName\Virtual Machines\VM-Instance-ID\VM-Instance-ID.bin

</memlocation>

<type type=”string”>Normal</type><vsvlocation type=”string”>

V:\ComputerName\Virtual Machines\VM-Instance-ID\VM-Instance-ID.vsv

</vsvlocation>

</savedstate>

Once you obtain the .bin and .vsv files you need to download vm2dmp and place in the dir of the windows debugging toolkit

Download Windows Debugging Toolkit

http://msdn.microsoft.com/en-us/library/windows/hardware/ff551063(v=vs.85).aspx

Now you can use the vm2dmp tool to convert the files into a crash dump.

Create a dump file using virtual machine state files:

vm2dmp.exe -bin C:\dir\ VM-Instance-ID.bin -vsv C:\VM\ VM-Instance-ID.vsv -dmp C:\dir\crashdump.dmp

Create a dump file from virtual machine and snapshot name:

vm2dmp.exe –vm ComputerName -dmp C:\VM\crashdump.dmp

vm2dmp.exe –vm ComputerName –snap “vm ComputerName -snap-SP1” -dmp C:\VM\crashdump.dmp

Note: If you have a downloaded path of the debugging symbols then you can specify –sym and then the directory of the symbols path.

Once you have converted to a crashdump you then use Volatility’s Imagecopy plugin to convert the crashdump format to a raw memory dump. For more information check out

https://code.google.com/p/volatility/wiki/CommandReference22#imagecopy

Example: python vol.py –f /dir/crashdump – -profile=profile of vm –O /dir/memory.raw

GrrCON DFIR Challenge 2013

Wednesday, 16. October 2013

This year was the 2nd time GrrCON decided to do a DFIR challenge during the conference and the winner this year received $500.

2013 Winners

1st place – @5ck

2nd place – @kjake

3rd place – @Patories

Jack Crook did an amazing job with the challenge the first time around in 2012. If you haven’t checked out the one from 2012, here is a review from the Volatility Labs blog.

http://volatility-labs.blogspot.com/2012/10/solving-grrcon-network-forensics.html

We only had about 2 weeks to actually design and build out the 2013 challenge this year so the limited time was a huge constraint on everything we really wanted to do. It actually took 10 different virtual machines, and 4 separate networks to create this challenge.

I would like to give a special thanks out to NVINT for hosting the servers and providing dedicated firewalls and IP’s for use. The Hacker Academy and Mad Security provided a huge support for the grading system and the website part of my challenge. I would also like to personally thank Rob Marmo and Nick Deneweth for their help making the challenge. Without their hard long nights working on the challenge before the conference the GrrCON 2013 DFIR challenge wouldn’t have happened this year.

Download the files for the 2013 DFIR Challenge here:

https://drive.google.com/folderview?id=0Bz3L4ZnVlUY8Q0VJbmJCV3JzR28&usp=sharing

2013 DFIR Challenge PDF Walkthrough here – GrrCON-Challenge-walkthrough

Security and Virtualization

Thursday, 1. November 2012

Another long gap between since my last post, what else is new.  I have no idea where the time has gone between working on development projects and testing too many things to list. So to kick off this post here is some interesting personal perspective on security in virtualization.

Now I am more than aware that 99% of the virtualization technology in production today is VMware and that Hyper-V is not at the top of most organizations’ consideration. I hope to change that perspective through this small review of some approaches that NVINT is taking as a small company. I am not here to try and sell Microsoft products (I am more of a Google Fan than anything) but when something is done right for more than one reason I always will like that product.

This will be a multi-part blog post that covers a few topics across Server 2012’s Hyper-V 3.0 to the 2012 System Center product family as they relate to the DFIR world.

Hyper-V

I will start with Hyper-V 3.0 inside server 2012 because there are a lot of great new features that really put it above other hypervisors. The first thing that really stands out as a major feature in 3.0 is that you can fully encrypt your storage clusters and allow access to that Shared SMB cluster over the network. This allows you to separate the Hyper-V boxes hosting the Virtual Machines from the machines hosting the SMB Storage cluster. This allows you to lock down access from only the Hyper-V servers to the storage cluster and monitor what accesses that data directly.

At NVINT I currently work with a Hyper-V 2008 R2 cluster that hosts over one-hundred virtual machines across six HP blade servers that make up the Hyper-V host machines. This Hyper-V cluster hosts the production virtual servers for our clients. I have been testing Hyper-V 3.0 for the past ten months, and I still feel like I have only opened one of the presents Santa left me under the tree. In my experience the stability and redundancy is really now on par with other hypervisors as where our current production 2008 R2 Hyper-V cluster lacks.

Windows Server 2012 features a lot of new capabilities, such as the new cloud networking features that scale a higher level network across WAN connections. It also contains the same powerful security features from the past like ASLR and DEP that are critical for security. I am not going to go into the infrastructure aspects because that has been done by the Microsoft engineers and I have provided the links below.

Check out these links if you want to know more about Server 2012 Hyper-V features.

Windows Server 2012 Hyper-V & Network Card (NIC) Teaming – http://www.aidanfinn.com/?p=12924

Hyper-V Network Virtualization Gateway Architectural Guide – http://technet.microsoft.com/en-us/library/jj618319.aspx

Hyper-V Network Virtualization Overview – http://technet.microsoft.com/library/jj134230.aspx

Network Virtualization technical details – http://technet.microsoft.com/en-US/library/jj134174.aspx

Windows Server 2012 Hyper-V Replica http://www.aidanfinn.com/?p=12147

The major upside to Hyper-V for NVINT is the fact that the Datacenter edition of windows allows you to host unlimited Standard editions of Windows in virtual machines without any extra license fees. (Note: this has limitations but that’s outside the scope of this post)

There is one really big feature of Hyper-V that I want to point out, as I feel there is a huge benefit from an Incident Response/Forensics point of view in terms of what you can do with the system that other hypervisors lack. For starters there are a large number of tools that you can use to analyze the Windows OS in many different ways. One of the best features is the ability to take a memory dump of the host os itself.

I have taken memory captures up to 80GB in the system and used Volatility to analyze those dumps successfully. This allows me to peer into the virtualization platform with more in depth detail that can be critical to understanding what is going on in the environment. Most people use VMware which makes it the most targeted Platform. Advanced techniques can be used to detect if the system is a virtual machine and even exploit out of the system to the host causing problems they were intended to prevent.  This may change in the future, but currently Hyper-V is not the largest target on the market in its virtual machines. I am well aware the Windows OS is targeted by everything because it’s used by almost any originations today. I also feel that VMware currently has risks with USB support, currently however that isn’t a drastic problem yet. Someday however I would guess that it will become a more targeted exploit.

Alongside Server 2012 and the features it brings to the table the system center products allow a great deal of management and monitoring across all typed of devices outside the Microsoft Family.

DPM 2012

I currently work with Data Protection Manager almost every single day, and I have come to enjoy this product for a few good reasons. A major benefit for DPM is that it allows you to actively back up the memory as a scheduled process that Microsoft calls a “System State” backup. It also has standard features with Full-Disk and Incremental backups based on a scheduled format. It does anything from attached SAN storage to Tape backups which allows you to scale it out fairly easily.

At NVINT we maintain 15 days of full disk backups and the “System State” included. This allows me to restore a Virtual Machine to a saved state inside Hyper-V or to a network location much like the features inside VMware consolidated backup. The huge benefit from an analysis standpoint is that Hyper-V stores the system RAM for a virtual machine in two separate files the .bin and the .vsv which can be used with vm2dpm  http://archive.msdn.microsoft.com/vm2dmp to convert them into a crash dump format that is compatible with Volatility or Microsoft Debugger for analysis. In an incident I can go into my Hyper-V server and use FTK Imager to create a copy of the live system’s disc and memory without installing anything in the Virtual Machine.

A key benefit of this process with FTK is to gather evidence without direct system interaction thus reducing the footprint on the compromised system. As a hosting provider this is critical because we can’t actively monitor with tools inside the OS itself. The tool Vm2dmp can also convert the DPM backup files because the .bin and .vsv file format is used to store the “System State” for protected systems. I feel that if something happens, that this type of insight can be critical with huge amounts of detail in what happened in the past for a better investigation. These backup files could reduce the data lost by an attacker using anti-forensics techniques. In most cases today the bad guys are getting really good at this process of covering their tracks so the DFIR community needs to get ahead of the problem before it occurs. Outside of virtual machines DPM can still perform “System State” backups of physical machines from Windows 7, Windows 8, Server 2008 R2 and Server 2012.

Here is some quick information on how to use vm2dmp

Create a dump file using virtual machine state files:

vm2dmp.exe -bin C:\VM\example.bin -vsv C:\VM\example.vsv -dmp C:\VM\memory.dmp

Create a dump file from virtual machine and snapshot name:

vm2dmp.exe –vm SERVER2008R2SP1-ENT-64 -dmp C:\VM\memory.dmp

vm2dmp.exe –vm vm SERVER2008R2SP1-ENT-64 –snap “vm SERVER2008R2-ENT-64 -snapshot-SP1” -dmp C:\VM\memory.dmp

Create a dump file using local symbols:

vm2dmp.exe -bin C:\VM\example.bin -vsv C:\VM\example.vsv -dmp C:\VM\memory.dmp –sym C:\symbols

For more information download the vm2dmp guide here: http://archive.msdn.microsoft.com/vm2dmp/Release/ProjectReleases.aspx?ReleaseId=3866

SCOM 2012

System Center Operations manager allows you to manage your network and give some detailed information into your environment in a central location. It supports Windows/Linux and SNMP devices alike. It allows options from an installed agent or agentless monitoring for information.

It has plenty of powerful rules that integrate into active directory and auto discovery rules to find new devices in the environment. This management server allows a centralized event log collection instead of taking up critical space on production systems. It can alert you via text or email if an event occurs based on custom rules. It even provides infrastructure information for System Administrators on descriptions, possible resolutions, and common causes.

I feel like it’s a more advanced Splunk that allows you target information with custom dashboards. I will not go into all the details because it can almost do anything and I provided some links to check out if you are interested.

For more information on SCOM check out these websites

http://blogs.technet.com/b/kevinholman/archive/2011/07/26/deploying-opsmgr-2012-a-quick-start-guide.aspx

http://www.scom2k7.com/installing-the-scom-2012-web-console-prerequisites-the-easy-way/

http://blogs.technet.com/b/kevinholman/archive/2011/07/26/deploying-opsmgr-2012-a-quick-start-guide.aspx

http://www.scom2k7.com/installing-the-scom-2012-web-console-prerequisites-the-easy-way/

http://technet.microsoft.com/library/hh278852.aspx

http://blogs.technet.com/b/momteam/

http://www.windowsnetworking.com/articles_tutorials/Introduction-System-Center-Operations-Manager-2012-Part1.html

http://technet.microsoft.com/library/hh278852.aspx

http://blogs.technet.com/b/momteam/

http://www.windowsnetworking.com/articles_tutorials/Introduction-System-Center-Operations-Manager-2012-Part1.html


VMM 2012

Virtual Machine Manger simply allows you to deploy fully updated virtual machines to your Infrastructure that follow a “Best Practice” standard with repeatable processes to avoid human mistakes. Even the simplest detail can be catastrophic for security protections in a complex environment. This also allows you to save time for the infrastructure guys allowing them to focus on much more important tasks.

I would love to go into more detail but I feel this post has covered enough for the day. Please feel free to leave any questions below or email me and I will respond as quickly as possible. Constructive criticism is always desired so please don’t hesitate.

I would to thank Andrew Case and Michael Hale Ligh for some proof reading and great suggestions. They did more than I expected as my first version was a little rough.

Some Outlook Auto-complete Information

Friday, 8. June 2012

It has been quite some time since my last post so I thought I would share a small experience today from an email migration and some information I learned. I will note that this information is already readily available so nothing new here.
Well I’m sure most people have had people get cranky if they ever switched to a new outlook profile. One of the big bummers in the office was not being able to see their Auto-complete list stored in their n2k file.
I of course had to disagree well knowing that Microsoft loves to be caching information. So with a little bit of help from Google I quickly found the DIR in which Outlook caches dat files C:\Users\”Username”\AppData\Local\Microsoft\Outlook
There is also this niffy little tool that if you pay for it in a corporate environment would allow you to edit the AutoComplete list that is stored in a .dat file inside C:\Users\”Username”\AppData\Local\Microsoft\Outlook\RoamCache
NK2Edit allows you to view the file with a ton of options. The N2K viewer is fully free but in order to use the editor will cost you a few coins. (Great price for big company’s look for a quick fix to an annoying co-worker due to lost auto-complete goodness)
The default file that was picked up by NK2Edit was C:\Users\wroersma\AppData\Local\Microsoft\Outlook\RoamCache\ Stream_Autocomplete_0_9F18B280B91C584490C33E11FC630E5A.dat
Now if you download the program you will notice that these files are caching quite a bit of information to aid the user in the search of a recent contact they have been in touch with.
The viewer shows that information such as the Index number, Address type, Display Name, Exchange Email String, Drop down name, Search String, Domain, SMTP address, Record Weight, Sending format and if there is duplicates.

This is a lot of information that I found stored in plain text when I viewed it in a hex editor.

So if you can rename files you could easily use this for your own purposes. One thing I will note in my search was that these files and back log for over a year in the past with a profile that isn’t even there anymore.

Some other files of interest in the same location

A little bit of volatility notes…

Wednesday, 2. May 2012

I want to review some notes from another previous Digital Forensics challenge. I will not present anything in here that no one hasn’t seen somewhere else and this is NOT  A REAL FORENSICS investigation and nor am I a real forensics expert or professional. I’m a student learning providing some of the very little I know.

I am only putting up notes if you actually want the reports and evidence files I used, please just ask and I would be glad to put them up. Honestly I have never done anything with volatility up until this point and this was the first rabbit hole I really went down in the field of forensics. I have played with a lot of forensics tools by I am by no means an expert. This is also stuff from last November.

These commands are for some people who want to get started with some really awesome memory forensics.

Using Volatility 2.0 inside a Backtrack 5 Virtual machine Run by VMWare Workstation 8  I ran the following commands  to obtain software information like running processes, dll, connections, and sid information and exported the information to report text files.

root@bt:~/Desktop/volatility-2.0#python vol.py psscan -f /root/Windows-XP-Professional.vmem –output-file=Report_Psscan.txt

root@bt:~/Desktop/volatility-2.0# python vol.py pslist -f /root/Windows-XP-Professional.vmem –output-file=Report_Pslist.txt

root@bt:~/Desktop/volatility-2.0# python vol.py connections -f /root/Windows-XP-Professional.vmem –output-file=Report_Connections.txt

root@bt:~/Desktop/volatility-2.0# python vol.py dlllist -f /root/Windows-XP-Professional.vmem –output-file=Report_Dlllist.txt

root@bt:~/Desktop/volatility-2.0# python vol.py getsids -f /root/Windows-XP-Professional.vmem –output-file=Report_getsids.txt


Then I used Volatility 1.3 with updated plugins and the following software in Volatility

Imaging-1.1.7

Inline-0.48_01

libdasm-1.5

Inline-Python-0.39

Pycrypo-2.0.x

Yara-1.4

Yara-python-1.4a

Pefile-1.2.10-63

volreg-0.6.tar.gz

volrip-0.1.tar.gz

by running the get_plugins.bsh script Author: Jamie Levy (gleeda)

Distorm3

Registry Ripper


root@bt:/Volatility# python volatility psscan2 -d -f /root/Windows-XP-Professional.vmem > /root/psscan2.dot

-psscan2.dot provides a processtree image in doty format to help understand running processes.

root@bt:/Volatility# python volatility screenshot -f /root/Windows-XP-Professional.vmem

Saving screenshot to 600.858ecda8.png

-screenshot plugin allows the creation of a screenshot for what the computer screen looked like at the time of the capture


python volatility hivelist -o 107563872 -f /root/Windows-XP-Professional.vmem > /203Report/Hivelist-Report.txt

–          The hivelist command locates where the registry hive files reside in memory so we can run registry ripper against them.


The following commands where used to export system hive file reports with reg ripper against the provided system hive files because his program can examine registry hive files and export evidence reports into easy to read text format documents.

perl rip.pl -r /root/Windows-XP-Professional.vmem@0xe1cc2008 -f ntuser > /203Report/NTUSER-dat-01-Report.txt

perl rip.pl -r /root/Windows-XP-Professional.vmem@0xe10ea820 -f ntuser > /203Report/NTUSER-dat-02-Report.txt

perl rip.pl -r /root/Windows-XP-Professional.vmem@0xe10aab60 -f ntuser > /203Report/NTUSER-dat-03-Report.txt

perl rip.pl -r /root/Windows-XP-Professional.vmem@0xe15a3a80 -f software > /203Report/software-Report.txt

perl rip.pl -r /root/Windows-XP-Professional.vmem@0xe1580448 -f sam > /203Report/Sam-Report.txt

perl rip.pl -r /root/Windows-XP-Professional.vmem@0xe15834b8 -f security > /203Report/Security-Report.txt

perl rip.pl -r /root/Windows-XP-Professional.vmem@0xe1035b60 -f system > /203Report/System-Report.txt


root@bt:/Volatility# python volatility window_list -f /root/Windows-XP-Professional.vmem > /203Report/Windows_List-Report.txt

–          The windw_list command allows us to export everything that was on the users screen at the point and time of capture of the memory image that answers the windows list question in the challenge.

I ran a lot of other stuff just looking around but this is some of the cool parts I wanted to highlight. Maybe I will put some more stuff out after I do a list of other things I want to do.


Tool Information


Cool Links to check out with more details and the real goods.

Type      Name    Publisher

Open Source      Volatility 2.0 + Volatility 1.3          Google Code

Site: http://code.google.com/p/volatility/


Type      Name    Publisher

Open Source      Backtrack 5         Backtrack Linux

Site: http://www.backtrack-linux.org/backtrack/backtrack-5-release/


Type      Name    Publisher

Commercial       VMWare Workstation 8                VMware

Site: http://www.vmware.com/products/workstation/overview.html


Type      Name    Publisher

Open Source      Imaging-1.1.7

Fredrik Lundh

Site: http://effbot.org/downloads/


Type      Name    Publisher

Open Source     Inline-0.48_01

Brian Ingerson


Site: http://search.cpan.org/~sisyphus/Inline-0.48_01/


Type      Name    Publisher

Open Source      Inline-Python-0.39

Ange Albertini – Google Code

Site: http://code.google.com/p/libdasm/updates/list


Type      Name    Publisher

Open Source     Pycrypo-2.0.1

A.M. Kuchling

Site: http://www.amk.ca/python/code/crypto.html


Type      Name    Publisher

Commercial       Yara-1.4

Google Code – Victor Manuel Alvarez

Site: http://code.google.com/p/yara-project/downloads/list


Type      Name    Publisher

Open Source     Yara-python-1.4a

Google Code – Victor Manuel Alvarez

Site: http://code.google.com/p/yara-project/downloads/list


Type      Name    Publisher

Open Source     Pefile-1.2.10-63

Ero Carrera

Site: http://code.google.com/p/pefile/


Type      Name    Publisher

Open Source     volreg-0.6.tar.gz

PUSH THE RED BUTTON – MOYIX

Site: http://www.cc.gatech.edu/~brendan/volatility/


Type      Name    Publisher

Open Source     volrip-0.1.tar.gz

PUSH THE RED BUTTON – MOYIX

Site: http://www.cc.gatech.edu/~brendan/volatility/


Type      Name    Publisher

Open Source     Distorm3

Google Code – Gil Dabah

Site: http://code.google.com/p/distorm/


Type      Name    Publisher

Open Source      Registry Ripper v2.02      Harlan Carvey

Site: http://regripper.wordpress.com/program-files/


Screenshot Plugin output of the challenge

Registry Forensic Analysis DC3 302 2011 Challenge

Friday, 13. April 2012

I told you I would be back in no time with another dig from the archive on a file server it took me like 20 minutes to get 2 on my own network. It’s a long story but let’s say me and my virtual XTMv Watchguard firewall are not getting along. I set up a new ESXi box on my HP xw8400 workstation with the new raid card and transferred over my AD while my XTMv box got angry.

Back to forensics I actually going up the list only 1 step from last night to the 302 challenge from DC3 2011. This is the Shadow Volume Win7 Registry Analysis which was actually one of my favorites. Since the case is a registry case I used Harlan Carvey Registry Ripper v2.02 (regripperplugins_20110830.zip – version of plugins) against the provided system hive files because his program can examine registry hive files and export evidence reports into easy to read text format documents.

The challenge called for the following information provided by the Department of Defense.

I would later go on to do it with one of my favorite programs of 2011 Registry Decoder but I will save that for another post down the road because I plan to go much more into detail.

Description: Examiners must develop and document a methodology used to determine, from the provided Windows registry files obtained from a subject’s computer (used to create the 400 – Shadow Volumes Analysis Challenge), a method for detecting items of interest in the system Registry files.  Items of interest are any items that would be non-standard or not normally found on a majority of computers; or those items that indicate activity or awareness of the user that may be of interest to the investigation.

Report the exact registry key path for each item of interest listed below with any additional entry information.  Include a detailed explanation of your processes (software or technique) used to examine and detect the information, and the reason for your selections.

Examiners must also be concerned with recording a detailed methodology of the steps and recording the tools used to accomplish the task as part of their grade.”

Methodology

Notes:

Commands are highlighted in Bold Font

Selections are highlighted with Italic Text

File Hives where placed in the directory 302-Shadow-Volume-Win7-Registry-Analysis\Files\Hives\

Spaces where edited out of directory and file names to avoid command line errors(well I’m lazy and like to avoid the pain of “ “ )

I opened (with administrative privileges) the command prompt (cmd.exe) and ran the following commands.

Cd C:\Regripper

rip -r C:\302-Shadow-Volume-Win7-Registry-Analysis\Files\Hives\NTUSER.dat -f ntuser >> C:\302-Shadow-Volume-Win7-Registry-Analysis\Registry-Ripper-Report-NTUSER-dat.txt

rip -r C:\302-Shadow-Volume-Win7-Registry-Analysis\Files\Hives\System -f system >> C:\302-Shadow-Volume-Win7-Registry-Analysis\Registry-Ripper-Report-System.txt

rip -r C:\302-Shadow-Volume-Win7-Registry-Analysis\Files\Hives\software -f software >> C:\302-Shadow-Volume-Win7-Registry-Analysis\Registry-Ripper-Report-Software.txt

rip -r C:\302-Shadow-Volume-Win7-Registry-Analysis\Files\Hives\sam -f sam >> C:\302-Shadow-Volume-Win7-Registry-Analysis\Registry-Ripper-Report-Sam.txt

rip -r C:\302-Shadow-Volume-Win7-Registry-Analysis\Files\Hives\security -f security >> C:\302-Shadow-Volume-Win7-Registry-Analysis\Registry-Ripper-Report-Security.txt

Alright to reduce the massive amount of information I blast into these I will provide simple short links if you want to get into the nuts and bolts of my results. Please feel free to use some of my commands in your own investigation or practice. I will warn there are far more powerful features but in this case it wasn’t really required to go after any special registry keys that the Great DFIR community hasn’t already covered for newbs like me to be able to use.

Key Files of Interest: Files of Interest 302

Registry-Ripper-Report-NTUSER-dat Registry-Ripper-Report-NTUSER-dat

Registry-Ripper-Report-Sam Registry-Ripper-Report-Sam

Registry-Ripper-Report-Security Registry-Ripper-Report-Security

Registry-Ripper-Report-Software Registry-Ripper-Report-Software

Registry-Ripper-Report-System Registry-Ripper-Report-System

Alright I tried to keep the post a little shorter for browser friendly kindness. If anyone has suggestions please feel free to contact me on twitter, G +, or email me at wyattroersma@gmail.com. I would recommend leaving comments and feedback if you have something you want to see or possibly see something I could be doing better. I Love feedback because I can’t fix what’s broken if I’m blind from the problem.

Want more Registry Forensics information? Go buy the latest version of Windows Registry Analysis Book by the RR creator himself http://www.amazon.com/Windows-Registry-Forensics-Advanced-Forensic/dp/1597495808.

If your to lazy and not convinced then go check out the start of it http://www.forensicfocus.com/downloads/forensic-analysis-windows-registry.pdf.  I mean if you enjoyed my mini low level post at all then this will be the perfect bunny hole to chase down to feed the information monster inside.

In the coming days I will be posting some more Digital Forensics Challenge madness from my long endless nights of trying to figure this crap out. So please stay tuned as I will be going into Registry Decoder (Andrew Case doesn’t know it yet but I’m pretty sure I can get some comments from him about how it all came to be from the beginning) It will be a good dive into Registry Decoder which recently got nominated for Digital Forensics Software of the year, it will be a close race with Log2Timeline. I mean the log will prolly take it with the amount of power it offers.

Alright I’m finally off to do something along the lines of learning from this web thing. Turns out it can really take the time out of your life.

A final Note:

Follow @keydet89 for the Registry Goodies

Data Recovery DC3 2011 Challenge 303

Thursday, 12. April 2012

I felt like actually putting something out on a website I took down months ago. I have been busy with life crap, school and work. I am here to bring the return of my blog with a little guide or Methodology if you will of a DC3 challenge I did last year for 2011. If you are unfamiliar with the challenge what are you waiting for, a sign? well here is your Link http://dc3.mil/challenge/2012/

To get things into perspective of what the investigation indicated here is the Challenge instructions:


“Description: Examiners must develop and document a methodology used to examine and recover the contents of unallocated media.

The media in this instance is an image of unallocated space from a USB thumb drive.  Points will be awarded for recovering files from the image of that unallocated space and for providing the file(s) and any information on the recovered data.

Points will be awarded for the accomplishment in locating and providing the information requested, and the degree that you successfully accomplish this task.

Examiners must also be concerned with recording a detailed methodology of the steps and recording the tools used to accomplish the task as part of their grade.”

That basically cover what they instructed me to do. It also came with a raw image file “Memorex-TD-Classic.dd”

So for those looking for the quick results here they are in a CSV – Report file Files.cvs (Filelist )

If you care about how I got there well I’m getting there.

Frist a reference of all the things others created in order for a Noob like me to be able to pull something like this off.

Tools Information:

HxD – Hexeditor Version 1.7.7.0 http://mhnexus.de/en/hxd/

testdisk-6.13  – http://www.cgsecurity.org/wiki/TestDisk_Download/

FTK Imager v3.0.1.1467 http://accessdata.com/support/adownloads#FTKImager


Methodology

Notes:

Commands are highlighted in Bold Font

Selections are highlighted with Italic Text

The first thought I had was to export the file from the packed rar file they provided us to download. It also came with a provided MD5 Hash so I checked that to make sure it was the right file. (If you don’t know how to file hash I will be posting a how to later, hopefully most reading at least know this much)

I also try to use free programs for the most part however its sometimes has a place to actually use something that costs a little bit of coin.

For the Analysis my first instinct was to open the file in a hex editor and start poking around for information regarding the goodies we can use to recover it with as little effort as possible.

Hex Editor Analysis

I first started by renaming the provided file for process functionality from Memorex TD Classic to Memorex-TD-Classic which helps  avoid space errors in some programs. I also created the folder named “303” on the root of my C: drive. I then saved the new Memorex-TD-Classic in directory C:\303\Files.

I then open the file in Hexeditor Version 1.7.7.0 and examined the file and the first important evidence I came across was at offset: 0x00001803 hex value 45 58 46 41 54 which is “EXFAT” in ANSI which indicates a EXFAT file system used to be present on this image.

Understanding that exFAT file systems contain a boot sector for recovery purposes I decided to try and see if I could recover the entire image by restoring the boot sector so the computer could recognize the device. I mean why it would not be this easy to begin with.

I know of a nice little awesome program called testdisk that would easily allow me to pull this off if the recovery boot sector will work. (Note you can manually sure for the header of the boot record but I already knew it was there through my first trial solution that didn’t work)

Testdisk

A testdisk-6.12 program created by Christophe GRENIER has the ability to recover these types of file systems.

Step 1 in testdisk:

I placed this program into C:\303\ testdisk-6.13-WIP directory for organizational reasons. I opened (with administrative privileges) the command prompt (cmd.exe) and ran the following commands.

C:\Users\Triple>cd C:\303\testdisk-6.13-WIP

C:\303\testdisk-6.13-WIP>testdisk_win C:\303\Files\Memorex-TD-Classic.dd

(Screen shot  of step 1 commands)

Step 2: Select a media type

I then selected >Disk C:\303\testdisk-6.13-WIP>testdisk_win C:\303\Files\Memorex-TD-Classic.dd -515MB /492 MiB

(Screenshot Step 2 in testdisk: Select a media type)

Step2

Step 3: Please select the partition table type, press Enter when done

I selected the >[ None ] Non partitioned media because the structure is not any of the other listed formats and also a corrupted format.

(Step 3: Please select the partition table type, press Enter when done)

Step 4: Boot Sector Recovery

I then selcted the >[ boot ] Boot sector recovery option on the currently selected file Memorex-TD-Classic.dd.

(Screenshot Step 4: Boot Sector Recovery)

Step 5: Advanced File system Utility’s

I then selected >[ Advanced ] Filesystem Utils

(Screenshot Step 5: Advanced File system Utility’s )

Step 6: Copy backup superblock over superblock

Because the backup boot record is “exFAT OK” there is a boot sector backup that can be written to the main boot sector in order to restore the data in case the main boot record is damaged.

I then selected >[ Backup BS ] Copy backup superblock over superblock


Step 7: Copy backup exFAT boot record over main boot record, confirm? (Y/N)

Confirm the option to right the backup in order to recover the image

***Warning this will write to Evidence file

Type Y >Enter to confirm (Screenshot Confirmation screen)

Exit testdisk

FTK Imager

I then turned to AccessData product FTK Imager v3.0.1.1467 in order to mount the recovered image and export the file system in order to ensure the recovery worked.

Adding the image file C:\303\Files\Memorex-TD-Classic.dd

I then selected and right clicked the TD Classic [exFAT] to export a file hash list to C:\303\Files\Filelist.csv

I then selected the TD Classic [exFAT] to export a files… to C:\303\Files\ Memorex-TD-Classic this is evidence files exported from the image file showing that the image is intact after a unallocated file recovery.


You can review the Exported CSV I provided earlier but that is about it and all it took to perform a nice littler repair on some data. If anyone seen anything I missed/did wrong/ could do better please leave a comment and I will be sure to make a note of it and update the guide if need be. A few quick shout outs before I sign off into other random project I do.

I used Evernote for the documentation process and taking the screenshots. http://www.evernote.com/ if you haven’t installed it yet go ahead and give it a try, more than likely you will love it as well.

Also a quick shout out to Mark McKinnon, Andrew Case, and the others that helped me figure challenges out. The forensics community is amazing and extremely helpful when you reach out for it.

Later I’m out.